What's the one secret tool that top companies use to churn out successful products that sell like hot cakes and develop a cult-like following? How do the most successful companies get it right every single time, year after year? The answer: Prototyping is the way to amplify your product design process and supercharge your performance. Learn how to develop a hardware prototype. Covers 7 stages of product prototyping, common mistakes & lessons from 250+ builds at Analogy.
Hardware product prototyping gives you something that drawings and spreadsheets simply fail to deliver: a physical object that behaves, fails, and teaches. Every gap in your thinking surfaces faster the moment you hold the actual form in your hands. This is where product ideas stop being conceptual and start generating real evidence. When you develop a prototype, you shift from guessing to knowing, from assumption to verified reality. The most successful hardware founders treat prototyping as the fastest path to certainty, because every iteration teaches something the previous build could only guess at.
The purpose of a prototype stretches far beyond testing mechanics. It becomes your single most powerful communication tool when speaking with investors, contract manufacturers, or early adopters who need to see before they believe. A physical model in a pitch room creates instant credibility that slides and renders rarely match on their own. Founders who reach out to Analogy often share the same story: the day they walked in with a prototype was the day the entire conversation shifted. Product prototyping shortens the distance between vision and validation in a way that a document simply cannot replicate.
What are prototypes and why we need them
A prototype is a preliminary version of your product that helps creators refine and validate their ideas, and make improvements before investing in full-scale production. Prototyping is considered a vital and essential step in the product development process for its numerous benefits:
- Test your products functionality: Prototypes allow creators to test and validate their ideas in the real world. You can see whether it works as intended and meets the needs and expectations of your customers. They enable you to check the functionality, usability, feasibility, and desirability of a product before investing in mass production.
- Saves money before production: A prototype phase production can help you avoid wasting money on producing a product that may not work or sell well. The small scale production helps identify flaws and areas for improvement, saving time and money by preventing costly errors in the later stages.
- Determines a product’s usefulness: A prototype can help you test whether your product solves a real problem or adds value to your potential users. You can use it to measure the demand and market potential of your product and adjust your strategy accordingly
- Allows you to demonstrate your product to investors: A prototype helps to communicate the product idea by serving as a tangible representation. It helps convey the concept to potential customers, investors, partners, or media, and solicit feedback and suggestions for improvement showcasing its functionality and market potential. This builds confidence and credibility and can attract funding for further development.
- Highlights the proper materials to use: The small-scale production helps to determine the best materials, components, and techniques to use for the final product, as one can see which works best in terms of durability, quality, and functionality. It helps ensure the final product is made from materials that meet industry standards and regulations, as well as customer expectations.
The 7 steps of the product prototype development phase
The seven-step process exists because hardware product prototyping is iterative by design, and every step compounds the clarity of the next. Founders who compress or skip stages often discover the cost of that decision during tooling, or worse, at the production stage. The process works because each milestone builds a foundation that the following one depends on. Rushing from idea to physical build skips the intellectual work that protects your budget and timeline. Following a structured path to develop a hardware prototype reduces risk at every stage, and Analogy's work across 250-plus projects confirms this to be true. Take a deeper look at how the product development process maps to each of these stages across a full hardware project lifecycle.
What separates a prototype that moves forward from one that stalls is the quality of decisions made between stages. Hardware founders who develop a prototype with clear stage gates find it far easier to raise funding, align manufacturing partners, and manage scope. Every iteration you complete adds signal, and every signal tightens the product. The goal is to reach a production-ready state faster by making smaller, smarter, targeted builds.
Teams that anchor each prototype to a specific learning question move through the process with more momentum and far less rework at the end.
Step 1: Product idea and research -Define clear objectives
Before you start designing your prototype, you need to do some research on your target market, competitors, customer needs, and industry trends. This will help you identify the problem you are solving, the value proposition of your product, and the features and specifications you need to include. The first step in in making a prototype are ideation and research. Read how we conducted extensive research to understand the users of Bloom wireless charger, designed by Analogy for Eurotronic.
Research can be conducted by studying the market and market trends, analyzing user behavior and looking at past performance of similar ideas and products. There are a multitude of research methodologies that we employ at Analogy, demographic and psychographic segmentation, user studies and surveys, empathy mapping, competitor research, product breakdowns, etc.
These research techniques help the team at Analogy finalize the product prototype requirements.
Research in hardware product prototyping is the invisible load-bearing structure of the entire project. What looks like talking to users or reading trend reports is actually the work that prevents costly pivots three months into development. Founders who develop a hardware prototype with shallow market research often find they have solved a problem in a way the market has already rejected. At Analogy, the research phase receives the same rigor as the engineering phase, because the questions you ask here shape every decision downstream. Tim Brown's foundational piece on design thinking at Harvard Business Review makes a compelling case for why front-loaded research is the backbone of every successful product build.
Research also defines the boundaries of what your prototype actually needs to prove. Many teams develop a prototype far more complete than the stage demands, burning budget on details that belong in a later iteration. The discipline here is deciding what specific questions this build will answer, and constructing only what is required to answer them. Focused prototype research leads to focused builds, which drives faster learning cycles and a cleaner path toward production. Every rupee spent on research at this stage saves multiples of that same rupee later.

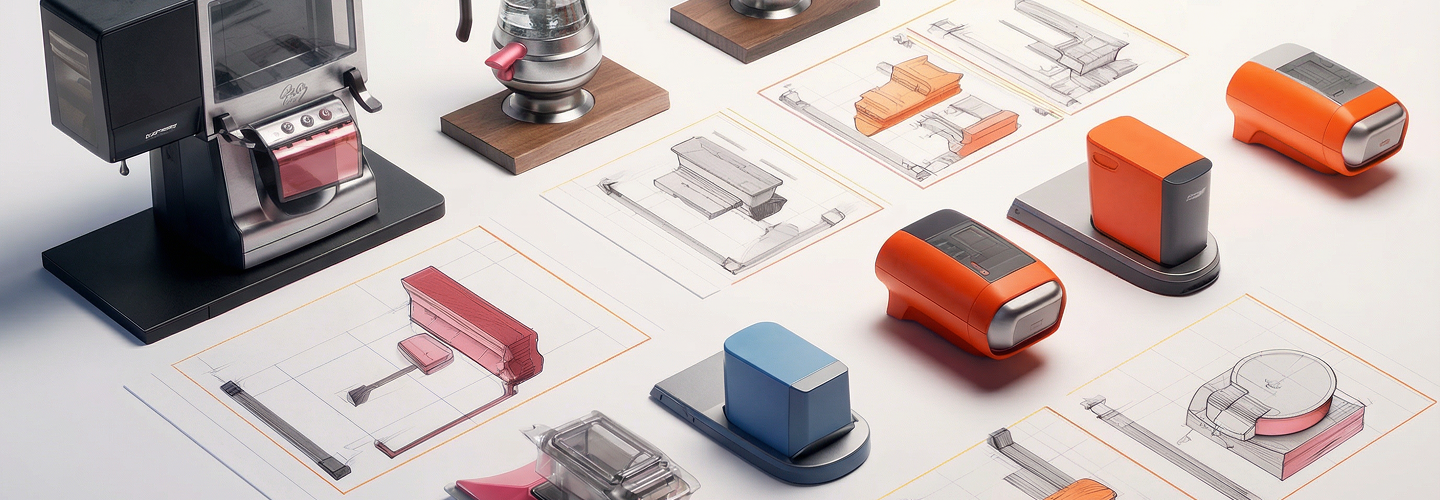
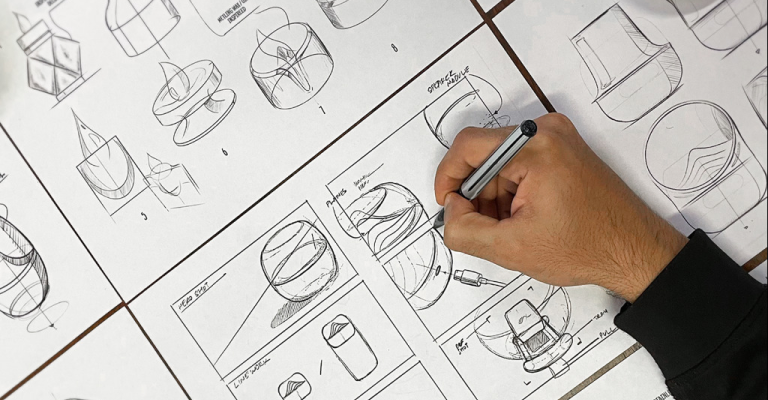
Sketching is where hardware product prototyping moves from abstract to spatial, and the shift in clarity is immediate. A sketch forces commitment: to proportions, to the placement of components, to how someone will actually hold or interact with the product. Even rough, imperfect sketches reveal structural tensions and interaction gaps that stay hidden inside a brief or a concept deck. The sketch is the first prototype, the one that costs almost nothing and teaches the most. Founders who jump straight to CAD often find themselves cycling back to the sketch stage anyway, after spending time and resources to discover what twenty minutes on paper would have shown.
It is often said that a picture is worth a thousand words. The second step is to sketch out your product idea on paper or on a digital tool. You don’t need to be an expert artist, just draw the basic shape, dimensions, and components of your product. This will help you visualize how your product will look like and how it will work.
A simple hand drawn sketch describing the visuals of a product from 2–3 angles can help you anticipate and solve numerous problems in prototype development, well in advance. Quite often, we begin our projects’ ideation phase by simply sketching on post it notes or A5 sheets. For projects like iDiya, the sketching phase was quite extensive since the form of the product had rotational symmetry. Read about our prototype phase production process for iDiya, a smart wellness device.
The sketch phase also serves as an alignment tool across your team, engineers, and stakeholders. When everyone is reacting to the same visual reference, the conversation becomes specific rather than speculative. Disagreements surface faster, solutions get proposed sooner, and the path forward sharpens considerably. For complex hardware concepts, running multiple sketch variations in parallel, exploring different form factors or interaction patterns, is one of the highest-leverage activities in the entire prototyping process.
A single focused sketch session can eliminate weeks of ambiguity from every stage that follows.
Step 3: Develop a virtual model from your design
Once you have a rough sketch of your product, you can use a software tool to create a 3D model of your product. This will allow you to see your product from different angles, add textures and colors, and make adjustments as needed. You can also simulate how your product will perform under different conditions and scenarios.
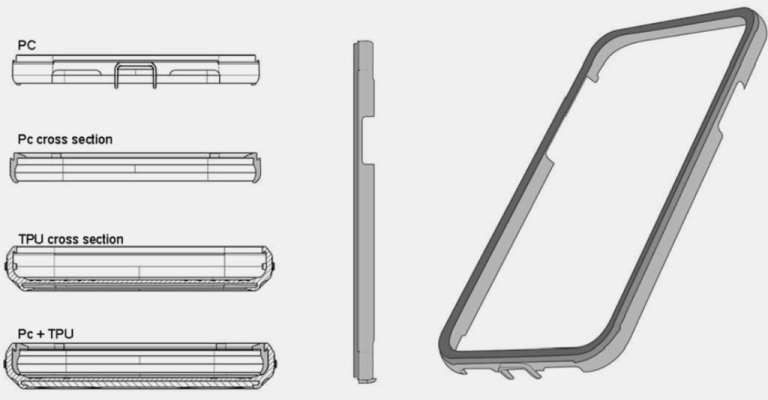
3D tools like SolidWorks, Fusion 360 and Rhinoceros 3D are quite helpful for developing 3D CAD models of your product. Each of these tools have their own strengths and weaknesses and your choice of tool will depend on multiple factors — where you are in the prototype development process, amount of versatility needed in the model, who is using the virtual model and what it is being used for. Our work for Cellairis designing rugged iPhone cases involved a lot of CAD modelling, which later helped out our clients by reducing their tooling cost by 60% with a 40% increase in impact protection.
A 3D virtual model transforms the sketch from a flat intention into a dimensional object that can be tested, stressed, and refined before a single physical component is produced. For hardware product prototyping, this step is where engineering feasibility meets industrial design, and the two must negotiate. CAD tools like SolidWorks or Fusion 360 allow your team to simulate tolerances, verify component clearances, and resolve interference issues before any tooling spend. What might take weeks on a physical workbench gets resolved in hours inside a virtual environment. The investment at this stage pays back immediately through fewer physical iterations in the rounds ahead.
The virtual model also becomes a shared language between designers, mechanical engineers, and manufacturing partners. When you approach a contract manufacturer with a fully resolved CAD model, you arrive as a credible counterpart rather than a hopeful client with a sketch. This distinction matters in pricing, lead time negotiations, and the level of technical engagement your team receives. Preparing your design for manufacturing is far smoother when the virtual model already accounts for tolerances and production realities from the beginning. Investing in a quality virtual model upfront saves multiples of that investment during the hardware prototype and manufacturing phase.
For many, this third step seems a bit intimidating at first, especially start-ups. No worries, we can help you with creating a virtual model and small-scale production before or during the product prototype phase.
Step 4: Determine whether you require assistance
Depending on the complexity and scope of your product, you may need some help from experts or professionals to create your prototype. For example, you may need an engineer to help you with the technical aspects, a designer to help you with the aesthetics, or a manufacturer to help you with the materials and production. You can also use online platforms or services to find freelancers or collaborators who can assist you with your project.
Knowing when to bring in external expertise is one of the most consequential decisions a hardware founder makes during the prototyping phase. First-time builders frequently underestimate the discipline gap between having a great idea and having the technical depth to develop a hardware prototype that is functional, manufacturable, and test-ready. Industrial designers, mechanical engineers, and electronics specialists each bring a different layer of capability to the build. Combining these disciplines in-house from day one is a significant commitment that most early-stage teams are unprepared to sustain. Understanding what concept design actually involves for hardware founders helps you identify exactly where support is needed before the first build begins.
Working with an experienced hardware product design studio brings more than technical skill. It brings a project methodology, a supplier network, and the accumulated learning of hundreds of prior iterations. Analogy has worked with founders at every stage, from those arriving with a napkin sketch to teams preparing for a second production run. The right partner helps you move faster, spend smarter, and build a prototype that genuinely advances the product.
Identifying the gaps in your team's capability early is what keeps the prototype phase focused and the budget intact.
Using our multiple models of engagement, we work with the largest and smallest companies, providing them with tailored assistance to reach their product and prototype goals. We work with recently incorporated startups headed by enthusiastic first-time founders, as well as large Fortune 500 companies with global teams and multiple business units. Click here to explore the product design services Analogy offers.
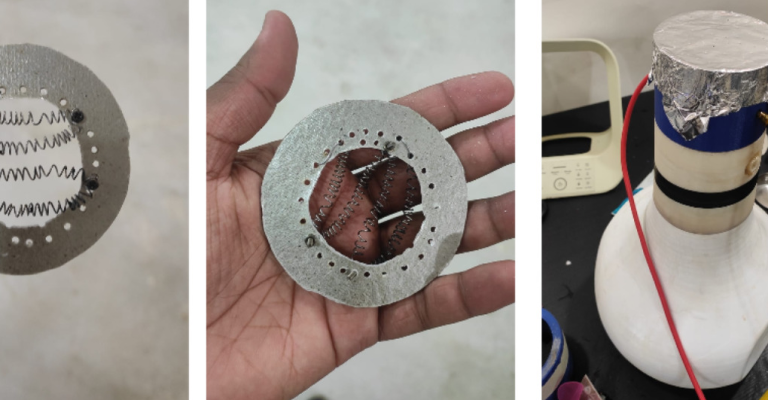
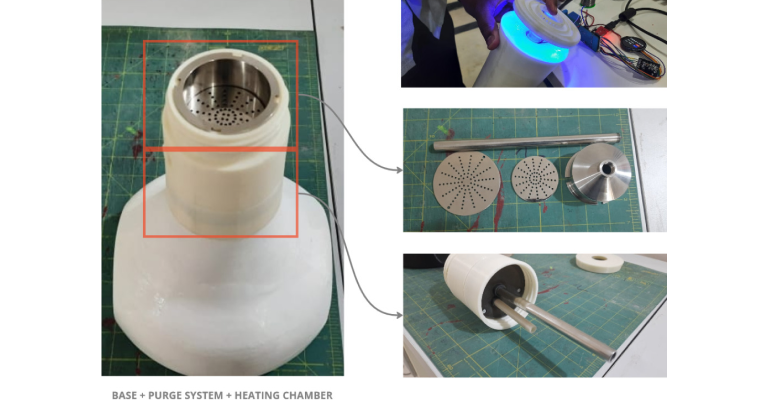
Step 5: Generate a proof of concept
A proof of concept comes before the fully functional prototype and the final product. Many inventors get caught up in the endless cycle of trying to perfect the Proof of Concept. What they forget is that multiple such models can be built to showcase and test various different functionalities and aspects of the products’ design. One model could validate the size and scale of the product. Another could demonstrate the core functionality while a third could be a purely aesthetic model showcasing the paint and finish scheme of the product. While designing the employee onboarding kits for Maersk, we developed multiple Proofs of Concepts to validate the size, items, graphics and textures.
The proof of concept is your product's first real conversation with the physical world, and what it reveals will change your design. Many founders expect a proof of concept to be a miniature version of the final product, but it is actually a focused experiment designed to answer one critical question. Does the core mechanism work? Can the form factor accommodate the component stack? Will users understand how to interact with it? Each of these questions deserves its own POC iteration, because trying to answer all of them with a single build usually results in a build that answers none of them properly. This stage is precisely where a structured prototype development process keeps your iterations focused and productive.
At this stage of hardware product prototyping, perfection is the enemy of progress. A rough, functional proof of concept that answers your most important question in week three is worth far more than a polished model that arrives in week ten. The POC exists to give you confidence to proceed or clarity to pivot, and either result is a genuine win for the project. Founders who approach this stage with curiosity rather than anxiety make better decisions and move through the process faster. The question to ask before every POC build is simple: what specifically does this version prove?
While designing the employee onboarding kits for Maersk, we developed multiple Proofs of Concepts to validate the size, items, graphics and textures.
Step 6: Choose the right type and develop your prototype
After you have validated your proof of concept, you can start creating your actual prototype. There are different types of prototypes that vary in their level of fidelity and detail. You can choose the type that best suits your needs and budget. Whether it is just a simple mock-up, a functional protype or even a production-ready one, they can help you avoid wasting resources and a delay in development.
Selecting the right prototype type for the right stage is a skill that separates experienced product teams from first-time builders. Many founders default to the most impressive-looking option, a high fidelity physical prototype, when the stage only calls for a functional model to test a single behavior. Hardware product prototyping moves fastest when each prototype is matched precisely to the question it is meant to answer. A low fidelity model that confirms your mechanism works is far more valuable at week two than a polished unit that looks production-ready but remains untested under real conditions.
The hierarchy of prototype types exists for a practical reason: resources. Each level of fidelity costs more time and more budget than the level before it. Staging your builds from low to high fidelity ensures that expensive decisions are made only after cheaper experiments have already validated the concept. This approach is central to how Analogy structures the prototyping journey for founders, starting with what teaches the most for the least, and adding complexity only as confidence grows. The result is a faster, leaner path to the build that genuinely represents your final product.
Some common types are:
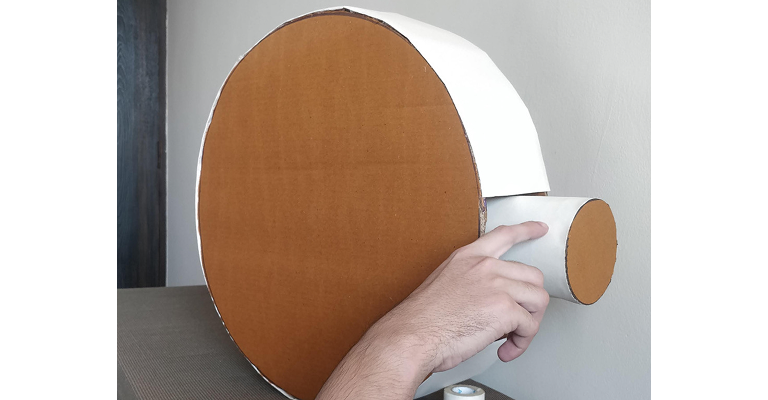
Paper prototype
A low-fidelity prototype that uses paper or cardboard to represent the physical appearance and interaction of your product. It is cheap and easy to make, but it has limited functionality and realism. Discover how we used one for the commercial kitchen design consultation project for Agnisumukh's stove.

Digital prototype
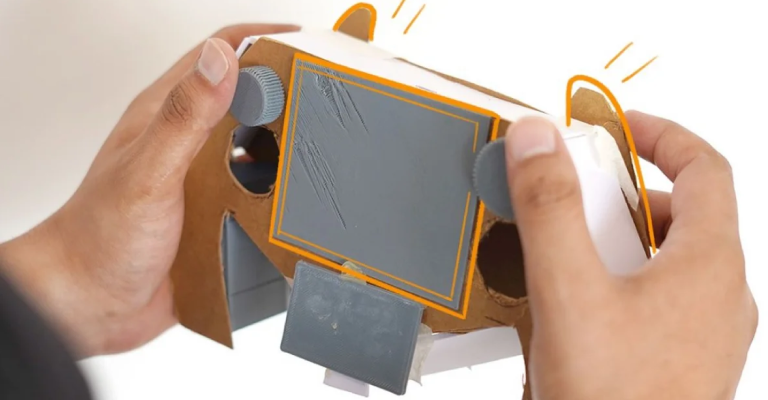
A medium-fidelity prototype that uses software tools to create an interactive simulation of your product. It is more realistic and functional than a paper prototype, but it may not reflect the actual look and feel of your product. Digital prototypes are used extensively to run through apps, websites and other digital products. Read about the process involved in building an AI powered camera fitness tracking app for our clients.
Low fidelity prototypes
These are quick and simple versions of a product that are used to test core functionality and user flows. They are usually created early on in the design process and don’t require a lot of time or resources to produce. Low fidelity prototypes can be either hand-drawn sketches or basic digital wireframes without color or content. These low-tech designs allow UX designers to e.g. visualize each screen’s layout, test navigation, and imagine user flows. Low fidelity prototypes are useful for gathering feedback on basic structural elements, such as information architecture, hierarchy, and content placement, without the potential distraction of visual design factors like colors and typefaces.
High fidelity prototypes
They are much more detailed versions of a product that closely resemble the final user experience. Usually, they are created later on in the design process, once the core functionality and user journeys have been validated with low fidelity prototypes. Creating high fidelity prototypes normally requires more time and resources than low fidelity ones. High fidelity versions can be created using software tools that allow designers to add colors, content, images, icons, fonts, and interactivity to their wireframes. These high-tech designs allow UX designers to test visual design ideas and get buy-in from stakeholders. They are also very useful for conducting user research sessions like usability testing, providing a more true-to-life scenario than low fidelity can offer.
Physical prototype
A high-fidelity prototype that uses materials and components that are similar or identical to those of your final product. It is the most realistic and functional type of prototype, but it is also the most expensive and time-consuming to make.
Step 7: Quality Control – Repeat any steps as needed and get production-ready
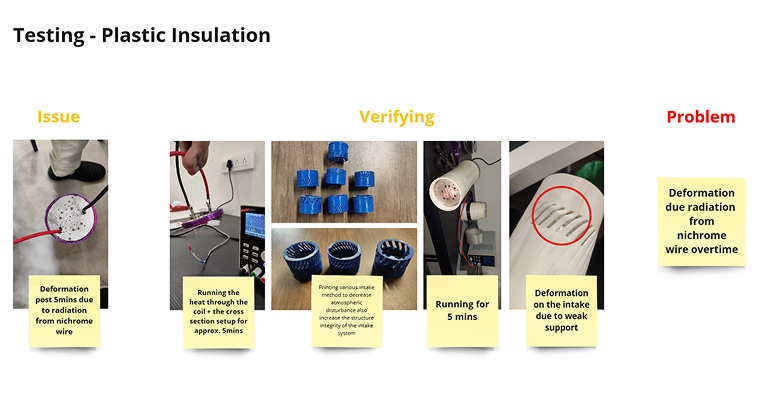
Quality control during hardware prototype development is about learning as much as it is about testing. Every structural failure, every component that misfits, and every user behavior that surprises you is information the product is giving you for free. Teams that move fastest through iterations are the ones that treat each failure as a signal rather than a setback. Building a rigorous testing protocol for each prototype stage, covering functional testing, drop testing, user trials, and thermal performance, creates a body of evidence that transforms development decisions from instinct to verified data. The discipline of testing each iteration thoroughly is what earns the right to move to the next stage.
Before you consider a prototype production-ready, it must have answered every question it was built to address. Teams under timeline pressure often rationalize moving forward with open issues, and those issues resurface during manufacturing at greater cost and greater inconvenience every single time.
The Product Path framework builds stage-exit criteria into every prototype milestone, so that teams move forward on evidence rather than optimism. Every unresolved question in the prototype phase is a paid-for surprise waiting in the production phase. Rigorous quality control at prototype stage is what keeps production on schedule and on budget.
The prototype phase development is an iterative process that requires testing, evaluation, and improvement. Before you partner with a prototype manufacturer like Analogy Design, you should test yours with real users or customers, collect feedback, measure results, and identify areas for improvement. You should then make changes to your design or functionality based on the feedback and test again until you are satisfied with your prototype. Discover our 5 ways to create positive impact on creative ideas.
Working with an experienced prototype manufacturer can streamline this process, especially before and during the small-scale production phase. We have years of experience, from start-ups to fortune 500 companies, and can offer valuable insights into materials, cost-efficiency, and production techniques, helping you make your product idea a reality and optimizing it for scalability.
Avoiding Common Mistakes in Product Design and Prototyping
The most expensive prototyping mistakes share a common root: urgency overriding process. Founders racing toward a launch date or a fundraising deadline often compress what should be iterative learning into a single high-stakes build. Hardware product prototyping rewards patience and punishes shortcuts in ways that become visible only much later, during production or at launch, when the cost of correction has multiplied many times over. The discipline of slowing down at the prototype phase is exactly what creates speed at the manufacturing phase. Fast Company's coverage of design-driven product development consistently surfaces the same pattern: great ideas that rushed past the prototype stage and paid heavily for it at launch.
For startups and new designers, avoiding common prototyping mistakes is crucial to saving both time and resources. The prototype development phase is where ideas take shape, and certain missteps can delay progress or lead to costly revisions. Here’s a guide to some of the top mistakes to avoid while prototyping and how to navigate them.
Lack of Clear Objectives and Specifications
It is essential to have defined objectives and specifications. Without clear goals, you may end up with a prototype that doesn’t align with requirements. Start by detailing the prototype development goals to ensure you’re on the right track.
Ignoring Target User Feedback
Prototyping without user feedback can lead to functional or aesthetic needs. Gathering feedback is critical to align with market expectations. Conduct user testing early and refine the prototype based on actual insights.
Choosing the wrong Prototype Type
As explained earlier in this article, there are different kinds and choosing an unsuitable prototype type can waste resources. For example, starting with a high-fidelity kind may be premature. Use small scale production during the product prototype phase to test concepts and progress to more advanced models as needed.
Underestimating the Importance of Testing
Testing is vital in the prototype production phase for durability, usability, and safety. Skipping thorough testing could lead to mistakes that appear in final production. Test each iteration rigorously to catch potential flaws and optimize for end-user satisfaction.
Not Budgeting for Changes
The process is iterative, and changes are often necessary. Failing to budget for adjustments may limit resources and compromise the final result. Allocate a portion of your budget for revisions based on user feedback or technical testing.
Avoiding prototyping mistakes ultimately comes down to one habit: asking "what does this version of the prototype need to prove?" before every build decision. Teams that anchor each iteration to a specific learning goal sidestep the trap of over-engineering early models or under-testing late ones. The best hardware founders are rigorous learners first and builders second. Their prototypes are focused, their iterations are fast, and their products arrive at production with far fewer surprises waiting on the factory floor. See how the complete hardware product development process shapes every stage from first sketch to manufacturing handoff.
Examples of Prototyping Mistakes we made and Lessons Learned
Real-world hardware product prototyping rarely follows the clean, linear path that frameworks describe. Every project carries its own surprises, and even experienced studios like Analogy face moments where the build reveals something the team failed to anticipate. The projects that taught us the most were the ones where the gap between expectation and reality was the widest. Those gaps, uncomfortable as they are, are where the most durable lessons about how to develop a hardware prototype actually live. See how the discipline Analogy built from early setbacks now shapes complex, multi-component builds like the air fryer design project and others in the portfolio.
What the Dostea, Violet Ease, and Bluemax projects share is a pattern that surfaces in hardware product prototyping teams around the world: pressure to move fast in one area created a blind spot in another. Speed without structure is expensive, and each setback reinforced the importance of stage-appropriate prototyping, defined objectives, and user feedback loops built into the process from the start. These experiences now inform every new project at Analogy and have made the studio sharper across every stage of prototype development. The discipline to define what each build must prove, and then hold to that definition, is the lesson all three projects ultimately delivered.
Let's be honest, nobody is perfect. The question is: Do you learn from your mistakes? At Analogy, we’ve faced various prototyping mistakes in the past. Here are a few projects with early challenges.
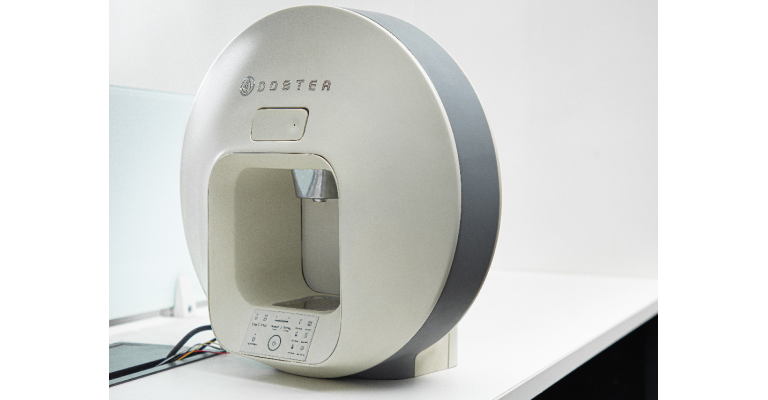
First on the list is the Dostea Tea Maker Machine project. Having high expectations on a high-fidelity prototype too soon, lead to added costs and more iterations.
Similarly, on the UV Sanitizing Unit project for Violet Ease, having a lack of clear objectives and specifications resulted in project delays and the founder having to raise additional investment.
On the project with the camcorder charger for Bluemax, ignoring target user feedback and moving straight to production lead to high cost in mass production and finally the product put on hold. We had to go and solve the problems leading to more development cost and a significant time increase in the delivering the project.
Such experiences have reinforced the importance of planning, using small scale production during the product prototype phase, and careful budgeting when it comes to product prototyping projects. Now that you have learned all about creating the first working copy of your invention, discover all the details about how to manufacture a product idea.
How Long Does Prototype Development Really Take?
One of the first questions every hardware founder asks is how long it will take to develop a prototype. The answer depends on three things: the complexity of the product, the clarity of the objectives, and the discipline of the process. For simple mechanical products, a first proof of concept can take two to four weeks. For products with embedded electronics, custom mechanisms, or unusual materials, that window extends significantly. Hardware product prototyping timelines are driven by decisions, and teams that make fast, informed decisions move through stages faster than those that deliberate without a structure to hold them.
What slows most teams down is ambiguity at the decision points between stages. When the criteria for moving from a proof of concept to a functional prototype are undefined, teams debate rather than build. Founders who work with experienced hardware product design studios sidestep this delay because stage transitions are built into the project structure from day one. Every stage in the Product-Path development service has a defined exit criterion, so momentum is engineered into the process rather than left to chance. The time investment in a structured approach pays back multiples by keeping each build focused and every iteration targeted.
Why Founders Get Stuck at the Prototype Stage
Prototype paralysis is one of the most common and least discussed challenges in hardware product development. It happens when a founder becomes so invested in perfecting the current version that they delay moving to the next stage, and the one after that. The prototype that was supposed to answer a question becomes the prototype that must answer every question, and the project slows to a standstill. Hardware product prototyping works best when founders understand that each version is a question rather than a destination. The goal is to move through questions faster, and that requires a willingness to learn from an imperfect model and build forward from what it reveals.
Fear is the driver behind most prototype stalls. Fear of user rejection, fear of investor scrutiny, and the deeper fear of discovering that the core concept requires a meaningful change. But these fears are exactly what the prototype process is designed to surface and resolve safely. A prototype that reveals a fundamental product flaw in week four is one of the best possible outcomes in hardware development, because the cost of that discovery at week four is a fraction of what it would be at week forty.
Paul Graham, whose essays on building and iterating for product founders have shaped the thinking of thousands of builders globally, argues that the discipline to act on what you learn faster than competitors is the real advantage in early-stage product development.
The founders who move fastest through prototype development are the ones who set a clear question for each build, run it, learn from it, and move forward. That discipline requires a methodology, and often a studio partner who holds the process accountable to its own stage gates. Analogy's approach to prototype development is built around the principle that momentum is a design choice: it has to be engineered into the project structure from day one, or urgency fills the gap with shortcuts. Book a strategy session to discover how the Analogy prototype and MVP service keeps founders moving through the prototype phase with clarity, confidence, and the right build at every stage.
Conclusion
To summarize, the development of a prototype is an essential step in creating a successful product. It can help you test, validate, improve, and present your idea in a realistic and tangible way. Following the 7 steps and avoiding the most common mistakes outlined in this article will bring you closer to making your product idea a reality. If you are looking for an experienced prototype manufacturer, do not hesitate to get in contact with us - one of the best product & industrial design firms in India - for a free discovery call.